What's new
  • Please do not post any links until you have 3 posts as they will automatically be rejected to prevent SPAM. Many words are also blocked due to being used in SPAM Messages. Thanks!

Gallery Dell G5 5000 series Desktop Cooling Mod (including a 3D Printed Rear adapter)

sswilson

Moderator
Staff member
Joined
Dec 9, 2006
Messages
24,742
Location
Moncton NB
Since finding a 1440p worthy video card is all but impossible these days, I took a fit and bought a Pre-Built Dell G5 Desktop with a Radeon RX 5700 XT.


The price was right, and the hardware is decent enough for my needs, but anybody who's looked into these knows that they've got a well documented issue with thermals. The stock intel cooler doesn't help, but the biggest issue is that they're throwing fairly high end cards into a small case that only has a single rear mounted 80mm fan! o_O

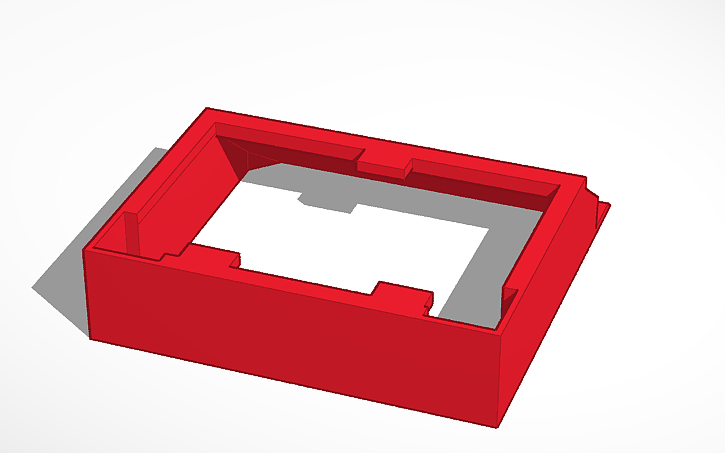
I'm not going to be re-inventing the wheel here... instructions on how to mount both a 120mm + an 80mm intake fan into this case have been around for quite a while. I have however taken it one step further by designing a 3D printed rear mounted 120mm fan adapter that takes advantage of the full height of the rear grill.

Pics to follow.......

edit: Here's the Thingiverse link to the adapter...
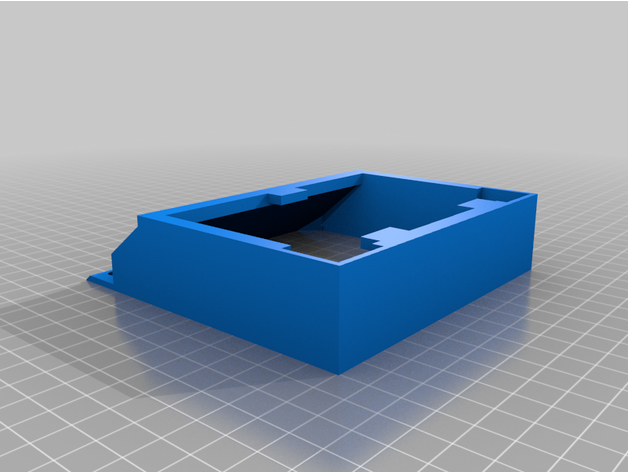
 
Last edited:

sswilson

Moderator
Staff member
Joined
Dec 9, 2006
Messages
24,742
Location
Moncton NB
Removed Bits.jpg

First step, these two items have to go.... the 3.5" HDD caddy blocks a good portion of the front intake area when an HDD is installed, and the part on the left is a GPU brace that I'd imagine is not a bad idea for shipping with the vid card in place, but isn't really needed when you're not going to be bouncing up and down with your case. (I ditched the included 3.5" 2TB drive in favour of a 2.5" SSHD).

80mm fan internal.jpg

80mm mounting screws.jpg

120mm fan internal.jpg


The front fans are pretty straight forward (if a bit tight to install). The 80mm can be secured using 2 standard fan screws from the front, and there's an existing 120mm 3D printed bracket that takes the place of (and attaches at the same point as) the HDD bracket pictured above.

I'm using Noctua 120mm 1700 RPM Redux and AC 80mm fans.

The front case cover is fairly open, but as you can see from the front pics, the front frame isn't completely open so depending on how dedicated to this mod I wanted to be it'd probably be best to cut away portions of the front in order to remove most restrictions. (I'm not going to go that far for a brand new system.... :) ).
 
Last edited:

sswilson

Moderator
Staff member
Joined
Dec 9, 2006
Messages
24,742
Location
Moncton NB
Think its possible to have 2 3.5" drives installed somewhere? Even if 3d printing is required.

I'll measure out how much room there is a the top when I get a chance, but it's pretty tight in there. At the very least... getting power to them even if you could find a way to shoehorn them in would require sata power extender(s) and/or splitters.
 

sswilson

Moderator
Staff member
Joined
Dec 9, 2006
Messages
24,742
Location
Moncton NB
rear grill.jpg

Now for the exhaust.....

This is the stock config. The 4 rubber tabs hold an 80mm exhaust fan internal to the case, but looking at the grill, there's a lot more open exhaust area than just 80X80mm. It's slightly over 120mm high, and 84(ish)mm wide. My plan is to use most of that open grill area to incorporate a 120mm fan.


That's my final model. I got up to V3 before I had something that worked as I wanted :) . I didn't bother trying to incorporate the mounting holes into the design (edit: The latest model incorporates 120mm fan mounting holes so it's only the internal mount holes that need to be marked/drilled) so it's basically Print-Mark internal mounting holes-Drill-mount.

Rear with side on.jpg

Rear angle side Full view.jpg

Rear Fan adapter internal attach.jpg

Total extrusion from the rear is 55mm as designed (25mm for the fan + 30mm for the adapter) but the "height" of the adapter can be easily scaled up or down to increase (or decrease) the angle (and thus distance) of the overhang.

Secured internally with 3 appropriately sized wood screws.
 
Last edited:

sswilson

Moderator
Staff member
Joined
Dec 9, 2006
Messages
24,742
Location
Moncton NB
Side Panel Handle clearance.jpg

I had initially wanted to install the adapter with the angle facing Right (as viewed from the rear) which would have left the IO area completely clear, but that orientation interfered with the rear handle on the side panel so it had to be installed facing Left.

Rear angle side.jpg

Closeup audio plug  clearance.jpg

Closeup USB clearance.jpg

With that in mind, there are a few restrictions on the rear panel. A low profile logitech USB receiver fits in the tightest USB slot, but anything longer probably would have to be installed in the ones further out. Similar issues arise from the Audio ports... I don't need access to them (I've got a sound card installed) so it doesn't affect my use case, but in order to access the Mic port a person might need to get their hands on a 90deg adapter (or just use the case plug for Mic).

Rear Fan Cable.jpg

Rear Fan Cable Filed.jpg

I managed to get the external fan cable routed through the PCI locking mechanism. The small amount of filing I did is the only physical modification I had to make to the case, and it's so minimal that I doubt Dell would notice if for some reason I had to send the PC back to them. :)

cable management.jpg

And finally..... not the prettiest cable management job I've ever done, but it's reasonably tight so shouldn't be much of a barrier to airflow. The 3 cable splitter I ordered from Amazon is questionable at best.... getting the fans to run @ PWM speeds (instead of 100% because they weren't getting the proper signal back) required a lot of fidgeting around with the wires in the connectors. I think I would have been much better off with one of the single board splitters.

Oh, and while I'm at it.... been a long time since I had a video card installed in one of my systems that was this bloody ugly!!!! That red PCB makes it look like a cheap 1990s IO card. :)
 
Last edited:

Sagath

Moderator
Staff member
Folding Team
Joined
Feb 7, 2009
Messages
6,644
Location
Edmonton, AB
Nice post SSW!

You should cross post this to RFD/Reddit. Theres probably a few people out that way inquiring about G5 mods as this is a really popular PC due to the GPU shortages.
 

sswilson

Moderator
Staff member
Joined
Dec 9, 2006
Messages
24,742
Location
Moncton NB
Heh.... I don't believe I've ever registered over on Reddit. :)

I'll be sure to post up a link the next time I see a G5 RFD thread (there might even be a thread in the ongoing discussion area), and I'll be uploading this to Thingiverse when I get a chance.
 

sswilson

Moderator
Staff member
Joined
Dec 9, 2006
Messages
24,742
Location
Moncton NB
Screenshot 2021-05-17 quiet 30 minutes.png

Screenshot 2021-05-17 Performance.png

I wish I had taken some readings prior to doing these mods, but I didn't so we're left with the end results to compare against the complaints folks have had WRT thermals.

These are 30+ minutes 1440p Furmark w/ CPU Burner running benchmarks. My thinking on the testing methodology was to try to replicate the complaints folks have had WRT G5's constantly throttling during heavy gaming. I'm not having much luck sourcing a reasonably priced 92mm tower cooler so I was expecting the CPU temps to be relatively high, but I was hoping that the temps would be low enough to prevent throttling, and that the vid card wouldn't be affected by a buildup of heat in the case over an extended period of time.

The top (higher temp) one is with the alienware control set to "quiet" profile, while the lower one is set to performance. If the numbers are to be believed WRT fan speed(s), the system fan port is tied to the Package temp, but doesn't scale at the same ratio as the CPU fan does since the max load System RPM is the same in spite of the CPU RPM being different between the two.

So.... what I think I'm seeing here (although I'm not finding any definitive "this is where an i5-10400f will start throttling" info) is that while the CPU temp is higher than anybody would want to run 24/7 (keep in mind this is with the stock cooler), even on performance mode it's still not high enough to max out the temp curve Dell has set since it's only running @ 60% Max RPM. I'm also not completely sure, but judging by the core freqs (3988 / 3989) it might be on the edge, but I don't think it's throttling yet.

Same goes for the Vid card.... temps are higher than I'd like, but not so much that I think it's going to throttle/melt.


Thoughts?

I'm going to keep my eyes open for a replacement HSF, but the temps I'm seeing under full load make me comfortable that I'll be fine until such time as I find one at a non-scalping price.

edit: Oh, and if anybody with an unmodified i5-10400f / RX 5700XT G5 5000 series happens to surf into this thread looking for cooling options, I'd greatly appreciate them getting some unmodified 1440p + CPU Burner Furmark temp numbers to compare. :)
 
Last edited:

Latest posts

Top