Mibs
Well-known member
Guide to ensuring a painless water cooling setup
Hello all, I thought I would spice up my build log a little bit with a sort of guide on how to make your watercooling setup go as smoothly as possible. Let me explain the inspiration for this guide. During the last week and a half since I first disassembled my pc to when I finally had everything running again, I ran into a large number of problems and setbacks. I didn't plan for everything to go perfectly, because it never does, but I never thought it would be as challenging as it was. However I want to emphasize how beneficial it was for me to encounter all these hiccups, because if it wasn't for that, then I wouldn't have learned half as much. So this guide is not so much a how-to on how to put together a kit, but more so a guide to prevent you from feeling experiencing grief that you may encounter. Now let's begin!
Alright so you've decided to take the plunge and put your components under water. Great choice! As we all know water cooling has many benefits, especially for those interested in overclocking and those who are adamant about having a quieter pc. For me watercooling was an obvious choice. I have my components overclocked, and since I recently joined the folding team there was a lot of heat being generated. Most coolers that come on modern gpus are real loud when running at 100% speed. Watercooling is the perfect alternative to those coolers. Not only did I choose it for the sake of temperatures and noise, but it was something I had never done before, and I needed something new to try in the world of PC modding.
So you've made your choice, what's the first thing you should do? Go shopping right? Wait! There are some important things you have to consider before making any purchases. Again keep in mind that these suggestions stem solely from the fact that I made many mistakes. What I'm suggesting will hopefully prevent you from making the same mistakes, but don't necessarily listen to everything I say. (I guarantee that there are plenty of people who will disagree with me, and their opinions are 100% as valid as what I'm saying. So please just consider what I'm saying and don't think that I think I know everything!) So, I digress. My first suggestion...
1. Don't rush it! If you're like me you want to get your rig up and running again as soon as possible, especially if it's your main. But if you don't have patience you're only going to get frustrated when you realize you can't finish it today due to a snag. Like I said earlier it took me a week and a half from disassembly to when I hit power again. This kind of project takes time and patience. I know a lot of us work full time and it's hard to find time in between. So save yourself the headache and just wait until the weekend. Or if you are lucky enough to have some time off then plan to do it then. But take my word for it that it's generally not a good idea to try and work on it when you get home from work if you have to work again the next morning. It causes you to make hasty decisions, and you will end up unsatisfied.
2. Throw your budget out of the window (or just reconsider it)! I don't mean to say a budget is unimportant, and I don't mean to say you have to spend lots of cash to get a good system, so just hear me out. When I first really considered getting a WC system, I planned for a certain budget. By the time all was said and done, I had spent over double what I had planned. This was for a couple reasons. The first is that I had to make 4 separate orders from NCIX before I had all my components and other miscellaneous yet necessary things. Ideally most people want to make 1 order. So I paid to ship 4 separate packages when I could have saved myself the shipping on all but 1 of them. Shipping a bigger box would cost more yes, but believe me not as much as shipping 4 separate packages. Obviously my initial plan was not good enough, so I had to keep ordering things I didn't realize I would need until too late. The second reason for unexpected costs is that things may break. If you are completely new to watercooling like me then being unfamiliar with a component makes the chances of it getting broken or damaged are higher. Accidents happen no matter how careful we are. The third reason you should reconsider your budget is that like me you may need to make countless runs to Home Depot or Canadian Tire or wherever you like to go for tools and hardware. And I don't mean the kind of hardware we all love here at HWC. This leads me to my third suggestion:
3. Take inventory of your tools and equipment first! As I was progressing through the build I would constantly find myself lacking the right screw or the right tool. This is important because I have never had a problem with this before when building a pc. Most of us who are comfortable inside a pc already have lots of essentials like a philips head screwdriver and plenty of leftover screws. When you want to install a WC loop however, be prepared to meet a point where there is something you may not have. Some things I didn't have: Decent utility knife, stubby flathead screwdriver, philips screwdriver with thin neck, cutting wheels for dremel, countless screws, distilled water...As you can see there were a number of things that I had to go buy or try and borrow from somebody. Having to go get the item I needed each time became very frustrating and made the build take much longer than originally planned. If I had taken note of what I would need first I could have saved myself much time and effort. Perhaps you already have all these things and if so great! Your experience just got much easier.
4. Plan out your build before you buy. If you are putting this loop into a brand new pc then it's going to be a little easier for you. Take some time when searching for a case to find out how easy it would be to install the loop inside. That should be one of your prime considerations when looking for a case. If you aren't prepared to make cuts or any other mods to your new case then you should consider buying one which has holes or some passageway already in place for the tubing. One thing I highly recommend is getting a case that's as big as you can handle. In my opinion the Antec P180 is a cramped case, and had this been a new build I would not have chosen it. Which means for those of you who are installing the loop into a pc you already have, you need to think extra hard and try and plan exactly where everything will fit in your case. Deciding where you want to mount the rad first is probably the best way to go, since it is generally the biggest component in the loop. I chose to mount mine on the back of the case.
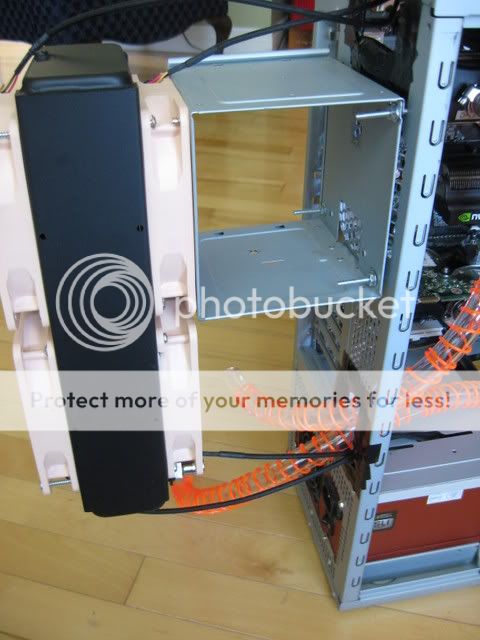
Here you can see I borrowed the upper hard drive cage from my case instead of buying a radbox. I saved myself 20 bucks and had a little fun cutting out the hole for the fan and drilling the mounting holes.
One of the biggest problems for me was mounting the pump. I really wanted it in the bottom of the case, because I didn't want to block up the upper hard drive cage area. In order for it to fit in the lower hard drive cage I had to make some cuts.
This is why it's so important to consider these things when choosing a case. I'm sure many people aren't comfortable with cutting their case, and that is perfectly fine. But if you're not, be prepared to change your loop plan if something in your loop doesn't fit. Once you have your loop planned out and you're sure it will all fit try and get a general idea of how much tubing you think you will need. Overestimate. Now that you have a plan, its time to make some purchases.
5. Buy more than you think you will need! I urge you, if you remember one thing from this guide let it be this point. You will hear many people telling you if you think you only need 10 feet of tubing, buy 25. They are not kidding! The chances of you making the tubing a perfect fit the first time are slim, no matter how careful and meticulous you are. My strategy was that for each section of tubing I would get an idea of where the section would go in the loop, estimate its needed length, then cut it longer than what I thought it should be. This allowed me then to trim as necessary. If there are 5 components in your loop buy more than 10 clamps or whatever you will be using to hold down the tubes. Most importantly, and I stress this point; buy more coolant than you think you will need! Whatever you're using for coolant, think of how much you need then double it. That is the amount you should buy. Leaks, spills and any number of things can cause your coolant reserve to quickly diminish. You can get a rough idea of how much you need just by doing some simple math as well.
Alright enough with me making suggestions of what to do before you buy, by now I figure you've picked out what parts you want. There are plenty of guides on the net, and even some here on HWC that are great at suggesting parts. Apollo4g recently wrote a guide on how to piece together a water cooling kit (http://www.hardwarecanucks.com/foru...w-piece-together-custom-watercooling-kit.html) and Babrbarossa has an excellent guide and build log which goes into part selection as well (http://www.hardwarecanucks.com/foru...-cooling-680i-antec-p180-build-log-guide.html). I am not here to do that, because I don't know near enough about water cooling parts to try and suggest to others what to get. Like I said before, try and make everything in one order if you can. Make sure you have everything you will need plus more in your shopping cart. Decide what fan configuration you want to use on your rad and only then get your fans. Save yourself some time and money and really think about everything you will need before making an order. Make a checklist, jot it down, or draw a diagram. I drew up several mock loops, and I even took a picture of the case and drew out where the components would go in photoshop. Anything like that will help you keep track of what you have and what you need. For some strange unknown reason that mankind will never know, I wasn't going to include a GPU block in my loop. If you don't want to put your gpu under water then that is fine! But try to avoid deciding two days later that you want to. That means you have to wait another couple of days depending on how long it takes you to get the part. Unless you live across the street from a computer store chances are you will have to do some commuting or online shopping to get what you need.
This was my first order:
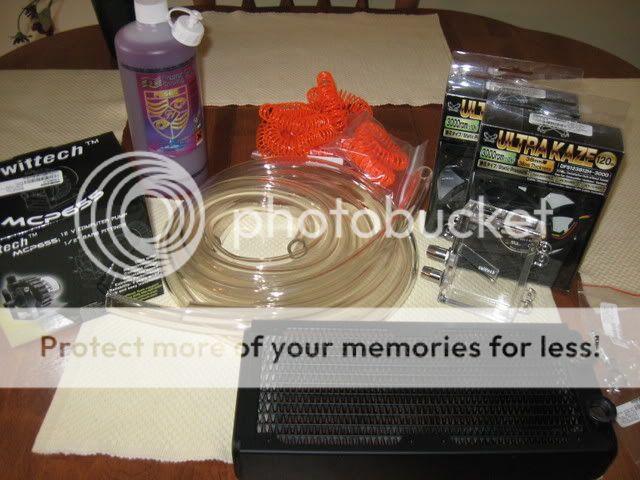
Notice what's missing? Maze 5, Fuzion V2, Set of Noctua NF-p12s, and lots of hardware. Note that I am not using the Ultra Kaze fans that I bought. These fans are crazy! I originally bought them because of the high CFM rating on them, thinking it would be a better match for my rad. Unfortunately when I first turned one on it wasn't so pleasant. Yes these fans are fast and they move a lot of air. But they are REAL loud. If noise isn't an issue for you and you want some high CFM fans then these are probably a good buy, otherwise, not recommended. Also, try to avoid letting loose power connectors near them :haha::
Preparation
Now you've got all your parts. Before you start opening every last box make sure you have a workspace prepared. If you are lucky enough to have a shed or garage or something else then take advantage of it. Clear away lots of room, because you will need more room than you need for a normal build. I unfortunately had nowhere to go except my living room floor. My shed was a complete mess and the desk I normally use was occupied for something else. Although this is probably pretty obvious, I strongly advise against building on the floor of the main room in the house. Once you've got yourself a permanent workspace that you can use interruption free (if possible) for the next couple of days you should start putting the parts out in piles. Try your very best to keep the hardware that came with an item with that item. Most importantly the screws that come with your rad. If you get a thermochill rad like I did, then please don't lose those screws! Pretty much all the screws and mounting hardware that come with your components can be bought at a hardware store, but going there is just another setback.
Hardware
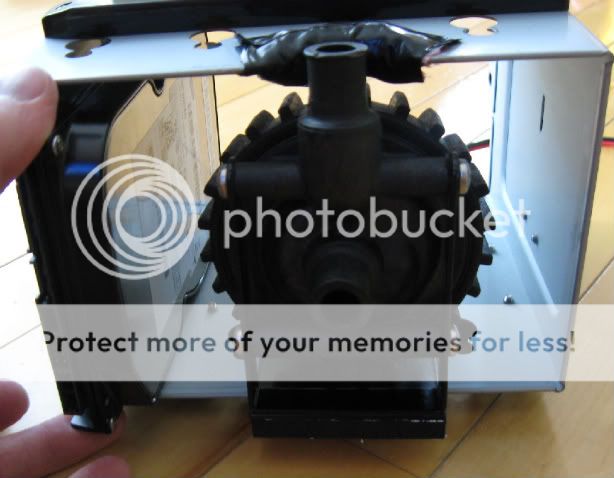
While on the subject of mounting hardware let me talk a little bit about what you should have and what you will need. Most of your components will come with some collection of hardware. All the blocks should have plates and bolts and all necessary hardware. The pump I bought, the Swiftech MCP655, came with a pad with adhesive material on both sides, as well as two bolts to mount to holes that you will probably have to create yourself. You can see in this photo that I mounted my pump in the bottom hard drive cage.

You can also see where I had to make a cut near the exhaust of the pump. I covered the cut with bubble wrap and electrical tape...Not the nicest solution but it works!
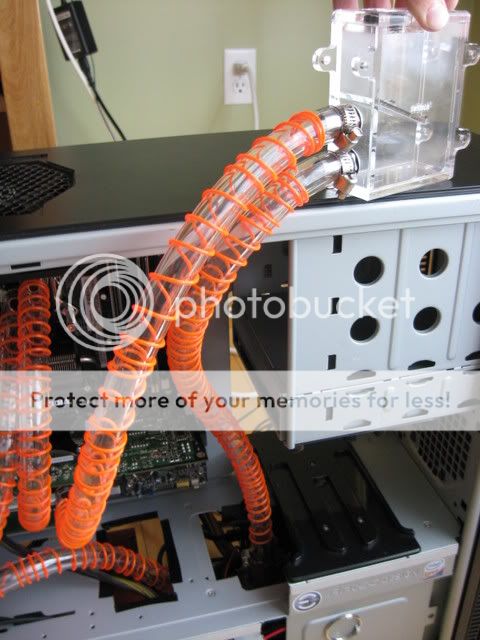
If you choose to get a reservoir it should also come with plenty of mounting hardware. The Swiftech microres comes with plenty of screws, and several different plates for various options. A 5.25" bay res has obvious mounting capabilities.
Mounting fans to the radiator
The one part of your loop that you may have trouble mounting is the rad. I for one went through much grief with this, mostly due to my lack of experience. I bought a Thermochill PA 120.2. It came with 8 1/2" self-tappers and 1 replacement bleed valve. Now I have no idea what hardware other rads come with, so this section may be a little bit specific to this rad, but still could be beneficial to readers. By now you have probably decided if you are going to have a push-pull or just a one-way configuration with your fans. If you are using push-pull chances are the rad didn't come with enough screws. Any Thermochill rad definitely doesn't. Here's the thing, your average 120mm fan is 25mm thick, about 1 inch. The screws you get are 1/2" in length. So if you've got a closed corner fan these screws are absolutely useless to you. What you will need are screws with a length of 1-1/4". This will fit through your fan and fit perfectly into the rad.
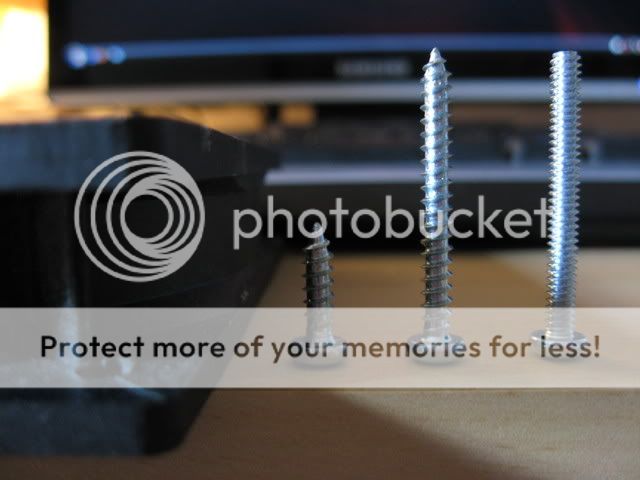
Here we have the 1/2"(left) 1-1/4"(middle) and a 1-1/4" machine bolt(left) Machine bolts are no good for mounting fans to the rad!
If you've got an open corner fan and want to use the 1/2" screws, you will need a screwdriver with a neck thin enough to fit into the hole. These screws are #6, so that's a pretty small neck for your average screwdriver. I found this one in an old car model kit. I don't know how old it is and it was a complete fluke that I found it.
As you can see it's a pretty tiny screwdriver and I couldn't get much torque out of it. If you use the 1-1/4" screws you can use any screwdriver on them since with those the neck of your screwdriver doesn't have to be as thin as a #6 screw. Either way you will most likely have to buy more screws. Just remember you need self-tappers! Here's another important point. If you take one of the provided screws and just test it out in the hole on the rad, it will be loose. This is because the screw needs the fan to bite into. So don't be worried if your screw doesn't bite into your rad. Just don't do what I did and pick up machine bolts by mistake. They will be useless to you. So just remember #6 1-1/4" self-tapping screws (or 1/2" if you have a small enough screwdriver). One final note about fan placement on the rad. If you plan far enough ahead you should be considering cable management as well. As you can see in these two pics I oriented the fans such that the wires from the two top fans were up as high as possible, and the wires from the bottom two fans were down as low as possible.
Top:

Bottom:

It can be quite frustrating when you are all finished mounting the fans only to realize the wire from your fan doesn't reach where it needs to, so try and remember to mount the fans in a way that works best for your cable management scheme.
Quick note about barbs
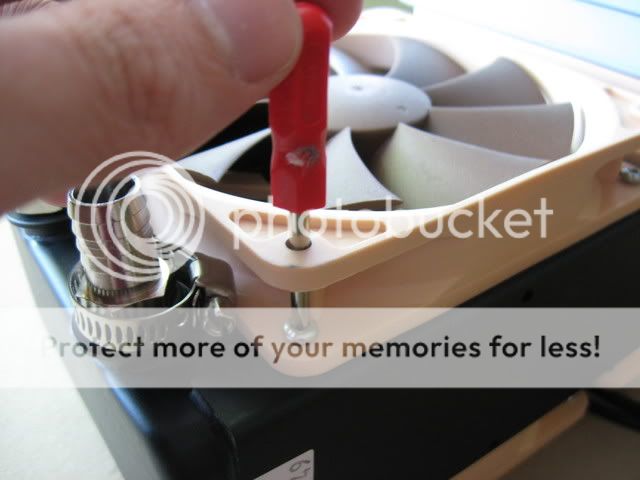
Now that you've got the fans mounted to your rad, the next thing you'll want to do is put in the barbs. Some rads may come with the barbs, the Thermochill didn't. Same goes for the res. Also, many people including myself recommend getting metal barbs if you can help it. The swiftech microres comes with plastic barbs, but they sell metal barbs for it (The ones I bought for it aren't that great though). Some will tell you that putting plumber's tape or teflon tape on the threads is not necessary. I have to disagree here, I do think this is very important. Applying this tape to your threads will greatly reduce the risk of leaking. The reason why I bring up this tape in this guide is to point out one thing that is easily overlooked: When applying the tape to the thread, wrap it in the direction opposite of how you would screw the barb into the res/rad.
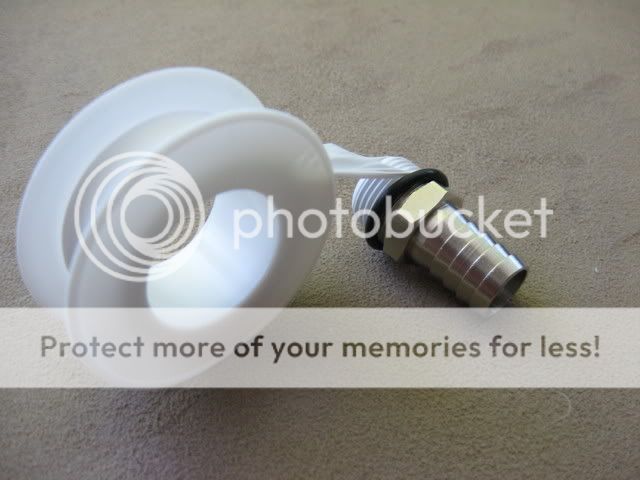
Looking at it from this angle you can see what I mean. You would screw the barb to the right, so apply the tape around counter-clockwise. The reason for this is that if the tape is applied in this way, as you turn the barb into the socket it will help apply the tape. If you have the tape wrapped the same way you are turning the barb, it will actually cause your tape to unwrap as the barb is turning. If you applied enough tape even in the wrong direction then this probably won't affect you very much, but it is still something you should pay attention to.
Flushing the rad
It is recommended that you flush out your rad before use. Although this is probably done at the factory you never know what you will find. This is pretty easy to do. I just set up a mini loop using left-over tubing or excess that I had cut off.
Instructions may vary depending on the manufacturer but flushing with distilled water should do the trick for you. In order to get the pump running without having the whole system plugged in you can do one of two things. I think the easier solution is to just borrow another computer you have lying around, regardless of how old it is. All you need it for is its psu. Just plug the pump into a loose connector on that and away you go. The other solution is to jump start the psu from the rig you are upgrading. There are how-tos on the web for this.
Water blocks
Mounting the blocks onto your components is pretty straight forward so I don't have much advice to offer in this department. Just take the usual precautions and procedures and everything should go smoothly. If you kept your hardware with the blocks when you opened them then you shouldn't have to worry about getting any more. One thing I do want to mention is that you should be careful when applying the heatsinks to the ram chips on your graphics card.
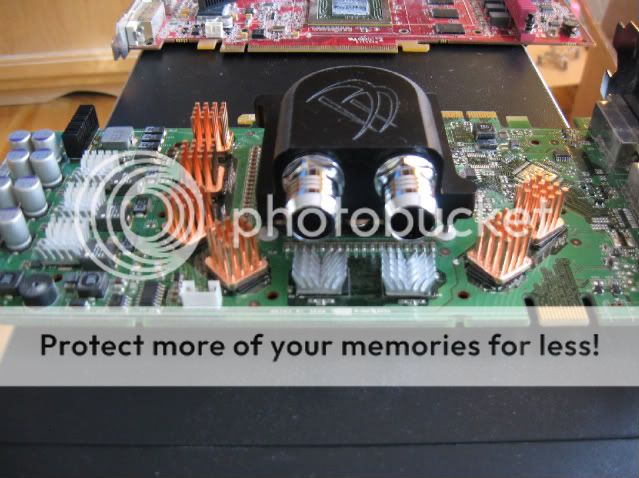
Here is my 8800GTS 512 after I first installed the waterblock and heatsinks. Those are the Swiftech MC14 heatsinks. I had to use some shorter sinks on the chips under the barbs since the tubing wouldn't fit otherwise. So depending on the configuration of your card and waterblock this may be an issue for you. I was lucky enough to have some lying around from when I bought an HR-03 a while back, so I just borrowed them from that. If I didn't have those it would have been another couple days trying to track those down. I also borrowed a few to stick onto other components on the card as well. The reason you should be careful with these heatsinks is that the adhesive material on them is, well barely adhesive. I applied the block and sinks to the graphics card on the first day, and by the time I had the rig up and running this is what it looked like:

Only two of the Swiftech sinks managed to stay on, the rest had to be replaced with the ones from the HR-03 which had much better adhesive material. It's possible to use a small dab of super glue to stick these on like Babrbarossa suggests, but I had the card already installed with tubing at this point, and didn't want to take it out again. If you don't have access to other heatsinks then you may want to try the glue method.
Running the tubing
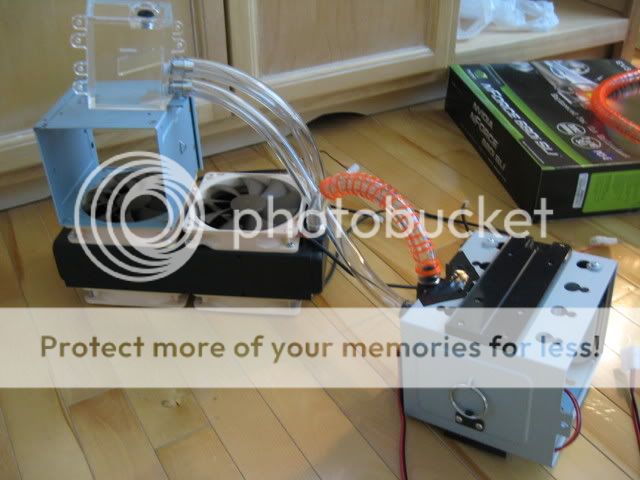
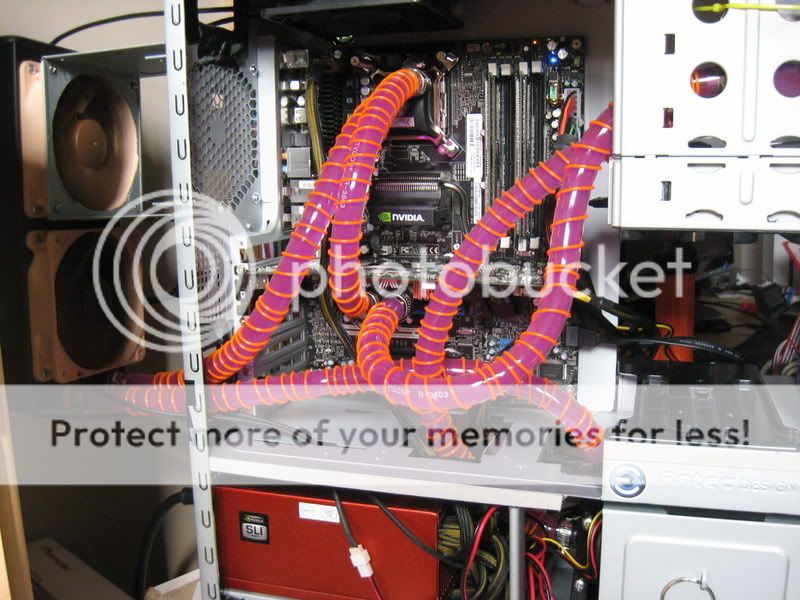
As I mentioned earlier my strategy for cutting the tubing was to decide where a section would go and how long it would be, then cut it longer than I needed it. If you bought extra tubing then you shouldn't need to worry about running out from cutting the lengths too long. There is one wise piece of advice I have heard from many, and that is "measure twice, cut once." This little phrase should be running through your head the entire time you are making your lengths of tubing. If you use my strategy for creating the lengths of tubing, you then have the ability to trim them to the perfect length once you are ready to attach it to the barbs. Even if you only give yourself an extra inch it will be better than cutting it too short and having to start again. When creating the lengths of tubing that will be attached to your reservoir if using one, it might be a good idea to make them long enough so that you can make the res the highest point in the loop:
Here I made it so that I could lift the res out, this mainly to make bleeding easier. Since that is the highest point in the loop, that is where the air bubbles will want to go. But with the extra length on those two sections, it may be harder to fit it all in the case like you had planned, so keep that in mind as well.
Finally, filling the tubes!
At this point you should have everything connected. All that's left now is to fill the tubing with your coolant. Depending on how you have your res or t-line mounted, it might be very useful to ask somebody to help you with this. For me it was a little awkward to hold the res and funnel together with one hand, and fill with the other. Before you do any filling you should get a bucket and some paper towel ready. Hopefully you won't need them, but I did. Before you do any filling double check, then triple check that your tubing is exactly how you want it. Even more importantly, make sure the tubing attached to your pump is going in the right direction. Let me explain further. When I filled up my loop for the first time, everything was going smoothly until I turned on the pump for the first time. I noticed it was sounding strange, and the coolant was not getting pushed as much as it should. Turns out I had the out port from the res connected to the exhaust on the pump. So gravity was forcing coolant out of the res down into the pump, yet the pump was trying to push it back up into the res. I only had to swap the two connections going to the pump, but in order to do this I had to drain what I had already poured into the loop. Hence why I needed a bucket and paper towels, and had to call upon my sister for help. I even managed to get one drop of coolant on my motherboard. Luckily it is non-conductive. I used paper towel and a few sprays of contact cleaner to make sure it was all gone. So again, just make sure your loop is set up properly before doing any filling.
With the tubes filled you should now have yourself a perfectly working water cooled pc!
Many people will suggest a 24 hour leak period without having the actual pc on. Just keep the pump connected to the power on the other pc or using your jump started psu. Doing this won't hurt and is generally a good idea.
The End
I hope you enjoyed this guide and found it somewhat informative. If your water cooling setup was any less painless thanks to this guide then I feel my work here is done. Setting up a water cooled rig was definitely the most fun I have had with a pc. And isn't that the point? Even though there are so many issues you can have, the key is to just have fun with it. Take it slow and don't panic, within no time you will have yourself a painless and beautiful water cooled pc!
I would just like to thank everybody on HWC here for helping me out with all the questions I had during my setup, and for all the support you give to everybody else!
Hello all, I thought I would spice up my build log a little bit with a sort of guide on how to make your watercooling setup go as smoothly as possible. Let me explain the inspiration for this guide. During the last week and a half since I first disassembled my pc to when I finally had everything running again, I ran into a large number of problems and setbacks. I didn't plan for everything to go perfectly, because it never does, but I never thought it would be as challenging as it was. However I want to emphasize how beneficial it was for me to encounter all these hiccups, because if it wasn't for that, then I wouldn't have learned half as much. So this guide is not so much a how-to on how to put together a kit, but more so a guide to prevent you from feeling experiencing grief that you may encounter. Now let's begin!
Alright so you've decided to take the plunge and put your components under water. Great choice! As we all know water cooling has many benefits, especially for those interested in overclocking and those who are adamant about having a quieter pc. For me watercooling was an obvious choice. I have my components overclocked, and since I recently joined the folding team there was a lot of heat being generated. Most coolers that come on modern gpus are real loud when running at 100% speed. Watercooling is the perfect alternative to those coolers. Not only did I choose it for the sake of temperatures and noise, but it was something I had never done before, and I needed something new to try in the world of PC modding.
So you've made your choice, what's the first thing you should do? Go shopping right? Wait! There are some important things you have to consider before making any purchases. Again keep in mind that these suggestions stem solely from the fact that I made many mistakes. What I'm suggesting will hopefully prevent you from making the same mistakes, but don't necessarily listen to everything I say. (I guarantee that there are plenty of people who will disagree with me, and their opinions are 100% as valid as what I'm saying. So please just consider what I'm saying and don't think that I think I know everything!) So, I digress. My first suggestion...
1. Don't rush it! If you're like me you want to get your rig up and running again as soon as possible, especially if it's your main. But if you don't have patience you're only going to get frustrated when you realize you can't finish it today due to a snag. Like I said earlier it took me a week and a half from disassembly to when I hit power again. This kind of project takes time and patience. I know a lot of us work full time and it's hard to find time in between. So save yourself the headache and just wait until the weekend. Or if you are lucky enough to have some time off then plan to do it then. But take my word for it that it's generally not a good idea to try and work on it when you get home from work if you have to work again the next morning. It causes you to make hasty decisions, and you will end up unsatisfied.
2. Throw your budget out of the window (or just reconsider it)! I don't mean to say a budget is unimportant, and I don't mean to say you have to spend lots of cash to get a good system, so just hear me out. When I first really considered getting a WC system, I planned for a certain budget. By the time all was said and done, I had spent over double what I had planned. This was for a couple reasons. The first is that I had to make 4 separate orders from NCIX before I had all my components and other miscellaneous yet necessary things. Ideally most people want to make 1 order. So I paid to ship 4 separate packages when I could have saved myself the shipping on all but 1 of them. Shipping a bigger box would cost more yes, but believe me not as much as shipping 4 separate packages. Obviously my initial plan was not good enough, so I had to keep ordering things I didn't realize I would need until too late. The second reason for unexpected costs is that things may break. If you are completely new to watercooling like me then being unfamiliar with a component makes the chances of it getting broken or damaged are higher. Accidents happen no matter how careful we are. The third reason you should reconsider your budget is that like me you may need to make countless runs to Home Depot or Canadian Tire or wherever you like to go for tools and hardware. And I don't mean the kind of hardware we all love here at HWC. This leads me to my third suggestion:
3. Take inventory of your tools and equipment first! As I was progressing through the build I would constantly find myself lacking the right screw or the right tool. This is important because I have never had a problem with this before when building a pc. Most of us who are comfortable inside a pc already have lots of essentials like a philips head screwdriver and plenty of leftover screws. When you want to install a WC loop however, be prepared to meet a point where there is something you may not have. Some things I didn't have: Decent utility knife, stubby flathead screwdriver, philips screwdriver with thin neck, cutting wheels for dremel, countless screws, distilled water...As you can see there were a number of things that I had to go buy or try and borrow from somebody. Having to go get the item I needed each time became very frustrating and made the build take much longer than originally planned. If I had taken note of what I would need first I could have saved myself much time and effort. Perhaps you already have all these things and if so great! Your experience just got much easier.
4. Plan out your build before you buy. If you are putting this loop into a brand new pc then it's going to be a little easier for you. Take some time when searching for a case to find out how easy it would be to install the loop inside. That should be one of your prime considerations when looking for a case. If you aren't prepared to make cuts or any other mods to your new case then you should consider buying one which has holes or some passageway already in place for the tubing. One thing I highly recommend is getting a case that's as big as you can handle. In my opinion the Antec P180 is a cramped case, and had this been a new build I would not have chosen it. Which means for those of you who are installing the loop into a pc you already have, you need to think extra hard and try and plan exactly where everything will fit in your case. Deciding where you want to mount the rad first is probably the best way to go, since it is generally the biggest component in the loop. I chose to mount mine on the back of the case.
Here you can see I borrowed the upper hard drive cage from my case instead of buying a radbox. I saved myself 20 bucks and had a little fun cutting out the hole for the fan and drilling the mounting holes.
One of the biggest problems for me was mounting the pump. I really wanted it in the bottom of the case, because I didn't want to block up the upper hard drive cage area. In order for it to fit in the lower hard drive cage I had to make some cuts.
This is why it's so important to consider these things when choosing a case. I'm sure many people aren't comfortable with cutting their case, and that is perfectly fine. But if you're not, be prepared to change your loop plan if something in your loop doesn't fit. Once you have your loop planned out and you're sure it will all fit try and get a general idea of how much tubing you think you will need. Overestimate. Now that you have a plan, its time to make some purchases.
5. Buy more than you think you will need! I urge you, if you remember one thing from this guide let it be this point. You will hear many people telling you if you think you only need 10 feet of tubing, buy 25. They are not kidding! The chances of you making the tubing a perfect fit the first time are slim, no matter how careful and meticulous you are. My strategy was that for each section of tubing I would get an idea of where the section would go in the loop, estimate its needed length, then cut it longer than what I thought it should be. This allowed me then to trim as necessary. If there are 5 components in your loop buy more than 10 clamps or whatever you will be using to hold down the tubes. Most importantly, and I stress this point; buy more coolant than you think you will need! Whatever you're using for coolant, think of how much you need then double it. That is the amount you should buy. Leaks, spills and any number of things can cause your coolant reserve to quickly diminish. You can get a rough idea of how much you need just by doing some simple math as well.
Alright enough with me making suggestions of what to do before you buy, by now I figure you've picked out what parts you want. There are plenty of guides on the net, and even some here on HWC that are great at suggesting parts. Apollo4g recently wrote a guide on how to piece together a water cooling kit (http://www.hardwarecanucks.com/foru...w-piece-together-custom-watercooling-kit.html) and Babrbarossa has an excellent guide and build log which goes into part selection as well (http://www.hardwarecanucks.com/foru...-cooling-680i-antec-p180-build-log-guide.html). I am not here to do that, because I don't know near enough about water cooling parts to try and suggest to others what to get. Like I said before, try and make everything in one order if you can. Make sure you have everything you will need plus more in your shopping cart. Decide what fan configuration you want to use on your rad and only then get your fans. Save yourself some time and money and really think about everything you will need before making an order. Make a checklist, jot it down, or draw a diagram. I drew up several mock loops, and I even took a picture of the case and drew out where the components would go in photoshop. Anything like that will help you keep track of what you have and what you need. For some strange unknown reason that mankind will never know, I wasn't going to include a GPU block in my loop. If you don't want to put your gpu under water then that is fine! But try to avoid deciding two days later that you want to. That means you have to wait another couple of days depending on how long it takes you to get the part. Unless you live across the street from a computer store chances are you will have to do some commuting or online shopping to get what you need.
This was my first order:
Notice what's missing? Maze 5, Fuzion V2, Set of Noctua NF-p12s, and lots of hardware. Note that I am not using the Ultra Kaze fans that I bought. These fans are crazy! I originally bought them because of the high CFM rating on them, thinking it would be a better match for my rad. Unfortunately when I first turned one on it wasn't so pleasant. Yes these fans are fast and they move a lot of air. But they are REAL loud. If noise isn't an issue for you and you want some high CFM fans then these are probably a good buy, otherwise, not recommended. Also, try to avoid letting loose power connectors near them :haha::
Preparation
Now you've got all your parts. Before you start opening every last box make sure you have a workspace prepared. If you are lucky enough to have a shed or garage or something else then take advantage of it. Clear away lots of room, because you will need more room than you need for a normal build. I unfortunately had nowhere to go except my living room floor. My shed was a complete mess and the desk I normally use was occupied for something else. Although this is probably pretty obvious, I strongly advise against building on the floor of the main room in the house. Once you've got yourself a permanent workspace that you can use interruption free (if possible) for the next couple of days you should start putting the parts out in piles. Try your very best to keep the hardware that came with an item with that item. Most importantly the screws that come with your rad. If you get a thermochill rad like I did, then please don't lose those screws! Pretty much all the screws and mounting hardware that come with your components can be bought at a hardware store, but going there is just another setback.
Hardware
While on the subject of mounting hardware let me talk a little bit about what you should have and what you will need. Most of your components will come with some collection of hardware. All the blocks should have plates and bolts and all necessary hardware. The pump I bought, the Swiftech MCP655, came with a pad with adhesive material on both sides, as well as two bolts to mount to holes that you will probably have to create yourself. You can see in this photo that I mounted my pump in the bottom hard drive cage.
You can also see where I had to make a cut near the exhaust of the pump. I covered the cut with bubble wrap and electrical tape...Not the nicest solution but it works!
If you choose to get a reservoir it should also come with plenty of mounting hardware. The Swiftech microres comes with plenty of screws, and several different plates for various options. A 5.25" bay res has obvious mounting capabilities.
Mounting fans to the radiator
The one part of your loop that you may have trouble mounting is the rad. I for one went through much grief with this, mostly due to my lack of experience. I bought a Thermochill PA 120.2. It came with 8 1/2" self-tappers and 1 replacement bleed valve. Now I have no idea what hardware other rads come with, so this section may be a little bit specific to this rad, but still could be beneficial to readers. By now you have probably decided if you are going to have a push-pull or just a one-way configuration with your fans. If you are using push-pull chances are the rad didn't come with enough screws. Any Thermochill rad definitely doesn't. Here's the thing, your average 120mm fan is 25mm thick, about 1 inch. The screws you get are 1/2" in length. So if you've got a closed corner fan these screws are absolutely useless to you. What you will need are screws with a length of 1-1/4". This will fit through your fan and fit perfectly into the rad.
Here we have the 1/2"(left) 1-1/4"(middle) and a 1-1/4" machine bolt(left) Machine bolts are no good for mounting fans to the rad!
If you've got an open corner fan and want to use the 1/2" screws, you will need a screwdriver with a neck thin enough to fit into the hole. These screws are #6, so that's a pretty small neck for your average screwdriver. I found this one in an old car model kit. I don't know how old it is and it was a complete fluke that I found it.
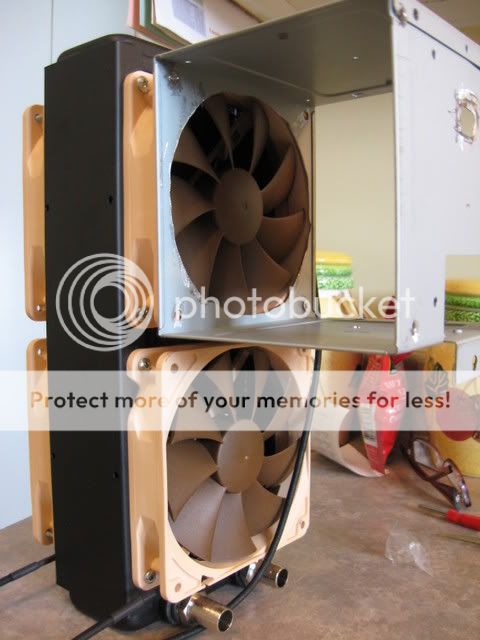
As you can see it's a pretty tiny screwdriver and I couldn't get much torque out of it. If you use the 1-1/4" screws you can use any screwdriver on them since with those the neck of your screwdriver doesn't have to be as thin as a #6 screw. Either way you will most likely have to buy more screws. Just remember you need self-tappers! Here's another important point. If you take one of the provided screws and just test it out in the hole on the rad, it will be loose. This is because the screw needs the fan to bite into. So don't be worried if your screw doesn't bite into your rad. Just don't do what I did and pick up machine bolts by mistake. They will be useless to you. So just remember #6 1-1/4" self-tapping screws (or 1/2" if you have a small enough screwdriver). One final note about fan placement on the rad. If you plan far enough ahead you should be considering cable management as well. As you can see in these two pics I oriented the fans such that the wires from the two top fans were up as high as possible, and the wires from the bottom two fans were down as low as possible.
Top:
Bottom:
It can be quite frustrating when you are all finished mounting the fans only to realize the wire from your fan doesn't reach where it needs to, so try and remember to mount the fans in a way that works best for your cable management scheme.
Quick note about barbs
Now that you've got the fans mounted to your rad, the next thing you'll want to do is put in the barbs. Some rads may come with the barbs, the Thermochill didn't. Same goes for the res. Also, many people including myself recommend getting metal barbs if you can help it. The swiftech microres comes with plastic barbs, but they sell metal barbs for it (The ones I bought for it aren't that great though). Some will tell you that putting plumber's tape or teflon tape on the threads is not necessary. I have to disagree here, I do think this is very important. Applying this tape to your threads will greatly reduce the risk of leaking. The reason why I bring up this tape in this guide is to point out one thing that is easily overlooked: When applying the tape to the thread, wrap it in the direction opposite of how you would screw the barb into the res/rad.
Looking at it from this angle you can see what I mean. You would screw the barb to the right, so apply the tape around counter-clockwise. The reason for this is that if the tape is applied in this way, as you turn the barb into the socket it will help apply the tape. If you have the tape wrapped the same way you are turning the barb, it will actually cause your tape to unwrap as the barb is turning. If you applied enough tape even in the wrong direction then this probably won't affect you very much, but it is still something you should pay attention to.
Flushing the rad
It is recommended that you flush out your rad before use. Although this is probably done at the factory you never know what you will find. This is pretty easy to do. I just set up a mini loop using left-over tubing or excess that I had cut off.
Instructions may vary depending on the manufacturer but flushing with distilled water should do the trick for you. In order to get the pump running without having the whole system plugged in you can do one of two things. I think the easier solution is to just borrow another computer you have lying around, regardless of how old it is. All you need it for is its psu. Just plug the pump into a loose connector on that and away you go. The other solution is to jump start the psu from the rig you are upgrading. There are how-tos on the web for this.
Water blocks
Mounting the blocks onto your components is pretty straight forward so I don't have much advice to offer in this department. Just take the usual precautions and procedures and everything should go smoothly. If you kept your hardware with the blocks when you opened them then you shouldn't have to worry about getting any more. One thing I do want to mention is that you should be careful when applying the heatsinks to the ram chips on your graphics card.
Here is my 8800GTS 512 after I first installed the waterblock and heatsinks. Those are the Swiftech MC14 heatsinks. I had to use some shorter sinks on the chips under the barbs since the tubing wouldn't fit otherwise. So depending on the configuration of your card and waterblock this may be an issue for you. I was lucky enough to have some lying around from when I bought an HR-03 a while back, so I just borrowed them from that. If I didn't have those it would have been another couple days trying to track those down. I also borrowed a few to stick onto other components on the card as well. The reason you should be careful with these heatsinks is that the adhesive material on them is, well barely adhesive. I applied the block and sinks to the graphics card on the first day, and by the time I had the rig up and running this is what it looked like:
Only two of the Swiftech sinks managed to stay on, the rest had to be replaced with the ones from the HR-03 which had much better adhesive material. It's possible to use a small dab of super glue to stick these on like Babrbarossa suggests, but I had the card already installed with tubing at this point, and didn't want to take it out again. If you don't have access to other heatsinks then you may want to try the glue method.
Running the tubing
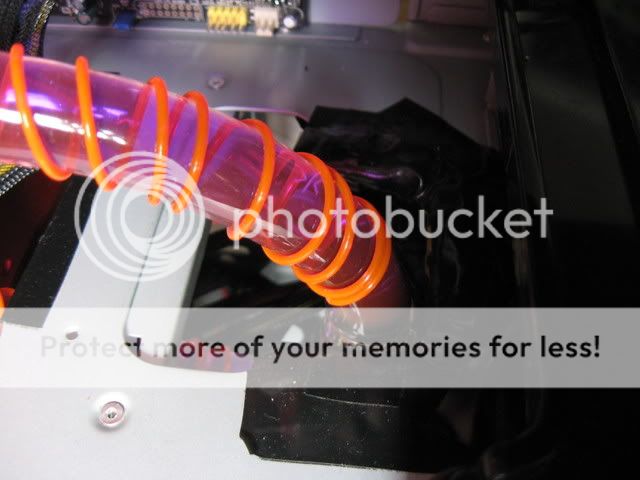
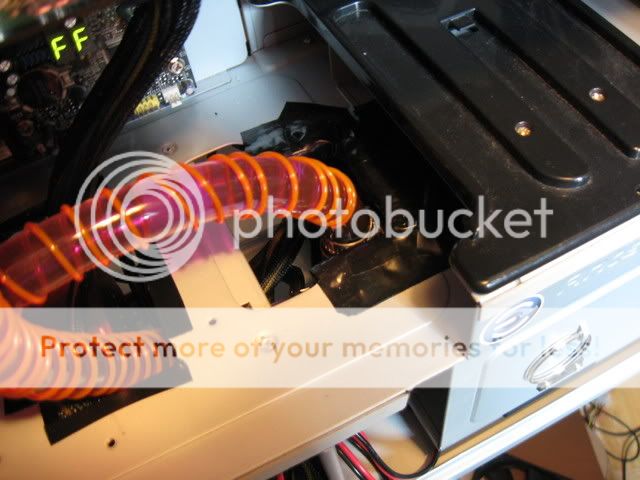
As I mentioned earlier my strategy for cutting the tubing was to decide where a section would go and how long it would be, then cut it longer than I needed it. If you bought extra tubing then you shouldn't need to worry about running out from cutting the lengths too long. There is one wise piece of advice I have heard from many, and that is "measure twice, cut once." This little phrase should be running through your head the entire time you are making your lengths of tubing. If you use my strategy for creating the lengths of tubing, you then have the ability to trim them to the perfect length once you are ready to attach it to the barbs. Even if you only give yourself an extra inch it will be better than cutting it too short and having to start again. When creating the lengths of tubing that will be attached to your reservoir if using one, it might be a good idea to make them long enough so that you can make the res the highest point in the loop:
Here I made it so that I could lift the res out, this mainly to make bleeding easier. Since that is the highest point in the loop, that is where the air bubbles will want to go. But with the extra length on those two sections, it may be harder to fit it all in the case like you had planned, so keep that in mind as well.
Finally, filling the tubes!
At this point you should have everything connected. All that's left now is to fill the tubing with your coolant. Depending on how you have your res or t-line mounted, it might be very useful to ask somebody to help you with this. For me it was a little awkward to hold the res and funnel together with one hand, and fill with the other. Before you do any filling you should get a bucket and some paper towel ready. Hopefully you won't need them, but I did. Before you do any filling double check, then triple check that your tubing is exactly how you want it. Even more importantly, make sure the tubing attached to your pump is going in the right direction. Let me explain further. When I filled up my loop for the first time, everything was going smoothly until I turned on the pump for the first time. I noticed it was sounding strange, and the coolant was not getting pushed as much as it should. Turns out I had the out port from the res connected to the exhaust on the pump. So gravity was forcing coolant out of the res down into the pump, yet the pump was trying to push it back up into the res. I only had to swap the two connections going to the pump, but in order to do this I had to drain what I had already poured into the loop. Hence why I needed a bucket and paper towels, and had to call upon my sister for help. I even managed to get one drop of coolant on my motherboard. Luckily it is non-conductive. I used paper towel and a few sprays of contact cleaner to make sure it was all gone. So again, just make sure your loop is set up properly before doing any filling.
With the tubes filled you should now have yourself a perfectly working water cooled pc!
Many people will suggest a 24 hour leak period without having the actual pc on. Just keep the pump connected to the power on the other pc or using your jump started psu. Doing this won't hurt and is generally a good idea.
The End
I hope you enjoyed this guide and found it somewhat informative. If your water cooling setup was any less painless thanks to this guide then I feel my work here is done. Setting up a water cooled rig was definitely the most fun I have had with a pc. And isn't that the point? Even though there are so many issues you can have, the key is to just have fun with it. Take it slow and don't panic, within no time you will have yourself a painless and beautiful water cooled pc!
I would just like to thank everybody on HWC here for helping me out with all the questions I had during my setup, and for all the support you give to everybody else!