xentr_theme_editor

  • Please do not post any links until you have 3 posts as they will automatically be rejected to prevent SPAM. Many words are also blocked due to being used in SPAM Messages. Thanks!

Work in progress Adam makes poor financial decisions build

There are, but I wanted to keep the open look of the front area rather than have it broken up by a plate.
Well with all your polishing efforts, I figured you could make it pretty much transparent ;)

I know it's not really a "thing" anymore, but a T-line tucked in behind the motherboard/side radiator instead of a reservoir could be another option too. Won't have a ton of excess fluid and may be harder to bleed.

Performance wouldn't be as good perhaps, but those Barrow(?) radiators with the DDC pump/res built into them could be another thought if the 240mm model would fit in the side.
 
xentr_thread_starter
You mean this?
Similar but 180 (that is a 90 that would just point to the steel top of the case/rad.

I've actually got five 8pin 180s already but they're all designed for GPUs, which all would go 180 'down' the way they're built. I need a 12VEPS that goes up. Kind of like this (my sweet MS Paint skills on display);

Spsgx.webp

I'm hoping the 'Type B' adapters I've ordered will work. It's the orientation of the male plug related to the female that throws it.
 
Similar but 180 (that is a 90 that would just point to the steel top of the case/rad.

I've actually got five 8pin 180s already but they're all designed for GPUs, which all would go 180 'down' the way they're built. I need a 12VEPS that goes up. Kind of like this (my sweet MS Paint skills on display);

View attachment 37940

I'm hoping the 'Type B' adapters I've ordered will work. It's the orientation of the male plug related to the female that throws it.
gotcha, I used to have a EPS extender for my massive phantek case way back.
 
I wish I realized you were using a drill attachments sooner. I have a 5in random orbit polisher sitting in the garage and I'm pretty sure I have a brand new polishing pad meant for glass sitting with it that I have not used yet. 5in pads might have been tricky to use on the bridge but probably would have worked well on the large sides of the GPU block where you were having issues.
 
xentr_thread_starter
I wish I realized you were using a drill attachments sooner. I have a 5in random orbit polisher sitting in the garage and I'm pretty sure I have a brand new polishing pad meant for glass sitting with it that I have not used yet. 5in pads might have been tricky to use on the bridge but probably would have worked well on the large sides of the GPU block where you were having issues.
I was going by hand first, and dabbled with a drill attachment but it wasn't going great.

I think I might have an old simoniz polisher that I've never used buried somewhere that I should take a look at and potentially use. Since I'll be waiting on the replacement reservoir and 8pin 180s I'll have time to up the polishing a bit.

I also think I'm going to try and find some cleanroom swabs since they're like flattened qtips. Might let me polish inside of the on the block better since they're flattened ovals.
 
xentr_thread_starter
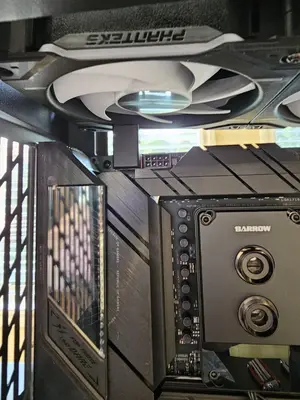
Well got the 180 8-pin PCIE adapters I ordered and one type will slot with some modification (have to cut the plastic bride between two pins on the connector). Unfortunately there still isn't enough clearance to mount the 360 rad on top with the 180.
20230922_170802.webp
20230922_170808.webp
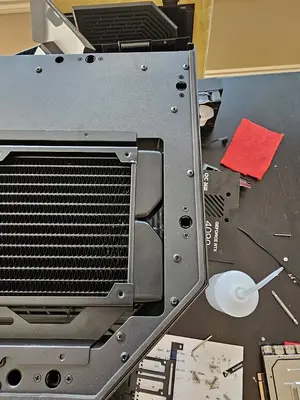
Sadly the way the case is set up on top, while there's a little space to move the 360 rad towards the front, the slots to mount the rad don't align.
20230922_170840.webp

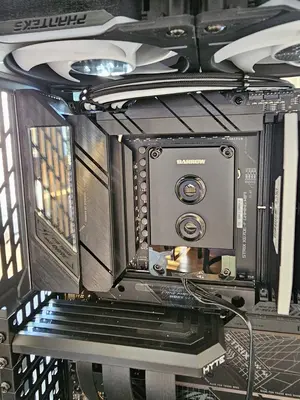
So without changing cases, motherboard or dropping to a 240 rad, I'm basically stuck doing the cables like this;
20230922_171041.webp
It's definitely not ideal aesthetics wise and while the cables have enough weight not to get sucked up into the fans, it's not ideal.

I'll have to consider if I can modify the tray a little to move the rad forwards or if I'll need to just accept it as is.
 
xentr_thread_starter
20230927_194311.webp
Finally had success with getting the block where I want it. Took sanding starting at 800>1000>1200>1500>2000>2500>3000 and I tried PlastX again with ho-hum results. Switched back to doing a polish with Novus heavy scratch polish and going from the high to medium cut pads then switching to the fine scratch polish and using the medium and light pads.

Now there's basically no visible hairlines and it's good enough I'm done playing with it. Resevoirs should arrive next week and then I can get back to building this thing (radiator fitup issues aside...)
 

Latest posts

Back
Top